Dental amalgam has been used for the restoration of Class I and Class II cavities for many years. However, concerns about its lack of aesthetics, health and environmental issues have led to an increase in demand for tooth coloured restorations in the posterior region. Resin composite offers the opportunity for clinicians to provide both aesthetic and conservative restorations that are sealed to the underlying tooth. This case demonstrates the replacement of a defective amalgam restoration using BRILLIANT EverGlow (COLTENE), which is a universal submicron hybrid composite that can be used for both anterior and posterior restorations.
Patient presentation
In this case, a 44-year-old male presented with persistent temperature sensitivity localised to the upper left first molar (Fig. 1). The patient had previously expressed interest in replacing the existing amalgam filling that was over 20 years old for a new tooth coloured alternative.
Examination and diagnosis
Following investigation the tooth was hypersensitive to sensibility testing particularly around the occlusal margins of the restoration. Fracture testing proved to be negative and no irreversible pulp problems were detected. Radiographs revealed some areas of cervical burnout but no significant bone loss or strong evidence of caries. A provisional diagnosis was made as marginal microleakage from the existing amalgam restoration +/- underlying secondary caries.
Treatment plan
Due to the symptoms it was agreed to remove the previous restoration to explore for cracks and remove any caries. A definitive direct composite replacement was planned to restore the tooth to full functionality and meet the patient’s aesthetic expectations. Prior to isolation, a shade selection (A2/B2) was made using the combined kit shade guide. It uses a simplified shade system with seven body shade groupings making single shade restorations very simplistic, which is ideal for posterior restorations. The inclusion of selective translucent and opaque shades allows for creative colour correction or incisal effects, which are particularly useful for anterior restorations.
Treatment protocol
Following anaesthesia, the upper left quadrant was isolated using a rubber dam. Meticulous isolation is required to facilitate contaminant free bonding and reduce the likelihood of microleakage. Once achieved it can make restoration placement less stressful by producing a very clean and tidy working field. Removal of the restoration revealed no underlying cracks and areas of secondary caries were fully removed until hard dentine was reached.
A sectional matrix was used to best rebuild the proximal wall (Fig. 2). Enamel was selectively etched using 37.5 % phosphoric acid (Etchant Gel S, COLTENE) then fully rinsed and dried. A universal one step bonding resin (ONE COAT 7 UNIVERSAL, COLTENE) was applied to both enamel and dentine using a microbrush in a scrubbing motion for two periods of 20 seconds followed by light air dispersion using a three-in-one syringe.
The first stage of restoration involved transforming the Class II cavity to a Class I by directly building up the proximal wall (Fig. 3). This increment was adapted to the cavity floor and matrix foil using a microbrush. The firm yet pliable consistency of BRILLIANT EverGlow allows efficient packing of the material with minimal pull back. The base of the proximal box was then filled using smaller 2 mm increments until it reached cavity floor level. A 20 second cure between each increment was completed using a high power LED curing light (Coltolux, COLTENE). The adapted cavity was then restored using individual cuspal increments to recreate each incline (Fig. 4). The material was injected into the chosen cavity wall with firm and steady pressure to ensure full adaptation to the cavity walls. A technique called point sculpting was then employed. This involved dipping a fine tipped probe into a light brown tint (Paint on Colour, COLTENE, Fig. 5). The probe was then used to sculpt the fissures directly, the tint helping to lightly colour the fissures whilst simultaneously acting as a wetting resin when removing excess. Once the shape of the cusp was satisfactory, a microbush was then used to adapt the composite to the peripheral margins to create a more seamless junction. The cuspal increment was then cured.
The same process was then repeated for the remaining cusps. To reproduce the more saturated and finer fissure stains, a dark brown tint was applied using an endodontic file (Fig. 6) at two points where the fissure patterns adjoin one another. This was then gently brushed using a microbrush to remove excess until a good saturation was achieved. Following the final cure, the matrix band was fully removed and the restoration cured from each side for 40 seconds. Excess resin was removed using an excavator and white Arkansas stone in a slow handpiece. Following rubber dam removal, occlusion was checked and adjusted using an Arkansas stone in a fast handpiece.
Finishing
A very simple polishing protocol was employed using the DIATECH ShapeGuard Composite Polishing Kit (COLTENE). The cup was first used to broadly polish the cuspal surfaces followed by the pointed cone, which was used to more finely polish towards the fissures. The polishing wheel was then used in a light feathering motion to produce a very generous final lustre over the entire restoration (Fig. 7), and was particularly useful in reaching the proximal areas. Final occlusal checks were performed (Fig. 8) to ensure a comfortable bite for the patient that also conformed to maximum intercuspation. Shimstock holds on adjacent teeth were verified to those noted preoperatively. ExaFinal appraisal BRILLIANT EverGlow proved to be a very pleasant material to use and handled very well to help produce a truly anatomical restoration that not only integrated well but also fully resolved the patient’s initial symptoms. The unique shade system allows for simple and efficient restoration of posterior teeth and avoids the need to stock numerous different shades. Inclusion of glass filler particles that have been reduced to below one micron allows for excellent polishability, especially when used with the ShapeGuard Composite Polishing Kit. This feature along with the choice of additional opaque, translucent and bleach shades would also make BRILLIANT EverGlow an excellent choice for aesthetic anterior restorations.
About the author
 Minesh Patel graduated with honours from Barts and the London School of Dentistry in 2009. He then went on to graduate with a Master’s degree in Aesthetic Dentistry at King’s College London in 2013 whilst simultaneously completing a one-year surgical and prosthetic implantology programme based in Cambridge. He currently works in a fully private practice in Thames Ditton, Surrey and spends time teaching on various postgraduate programmes at King’s College London as well as lecturing around the country on clinical dental photography.
Images and captions:

Fig. 1: Cavity prep and sectional matrix
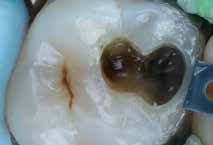
Fig. 2: Construction of proximal wall
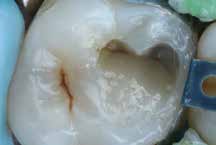
Fig. 3: First incremental cuspal build up
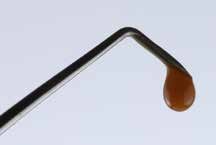
Fig. 4: Sculpting tip wetted with ochre tint
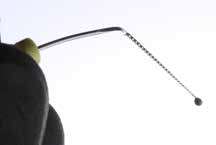
Fig. 5: K-file used to apply dark brown tint
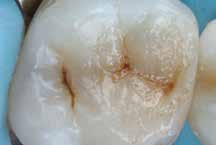
Fig. 6: Cuspal build up and tints completed

Fig. 7: Finishing and polishing completed
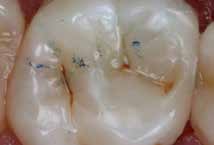
Fig. 8: Final occlusal checks performed