The microinvasive infiltration method for the aesthetic correction of white spots is becoming increasingly established in conservative dentistry. In this process, hypomineralised areas in the enamel are filled with a highly liquid resin, the infiltrant. The refractive index of the infiltrant is similar to that of the healthy enamel, which visually conceals the white spot.
Good permeability of the superficial enamel is crucial for successful infiltration. Depending on the thickness of the enamel layer on top of the hypomineralisation a more or less abrasive procedure is needed in order to get good access. In this article different abrasive methods will be discussed.
Sound or hypomineralised superficial enamel?
The nature of the enamel layer may vary, depending on the cause of the white spot phenomenon.
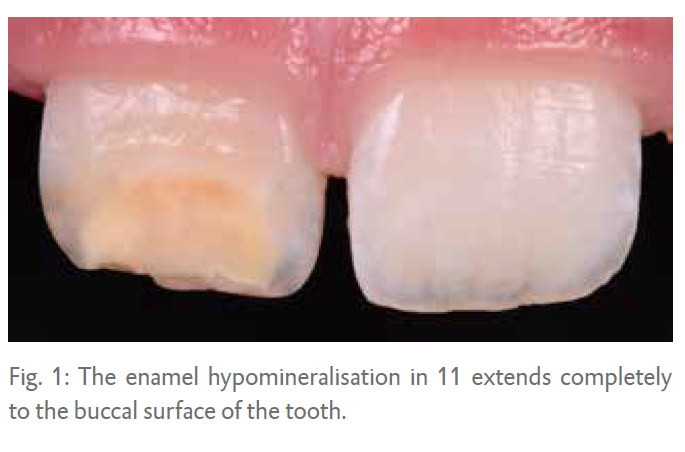
1. The lesion is located directly below the surface: In a lot of cases the enamel hypomineralisation completely up to the surface of the tooth (Fig 1). The superficial enamel of the lesion is weak and is more easily abraded or eroded compared to sound enamel. In carious cases there is a small surface layer of about 50 m in thickness when the enamel is not cavitated.
2. The surface layer has a relatively high mineral content - as in fluorosis cases - only in these cases the surface layer is about 200 m in thickness and also more acid-resistant.
3. The nature of the surface layer is unknown or variable: In trauma or MIH cases there are a lot of variables. Although a hypomineralisation may extend completely to the surface, this does not mean micro-abrasion is not necessary. Do however take into account the fact that hypomineralised enamel has less resistance to micro-abrasive procedures.
 Transillumination
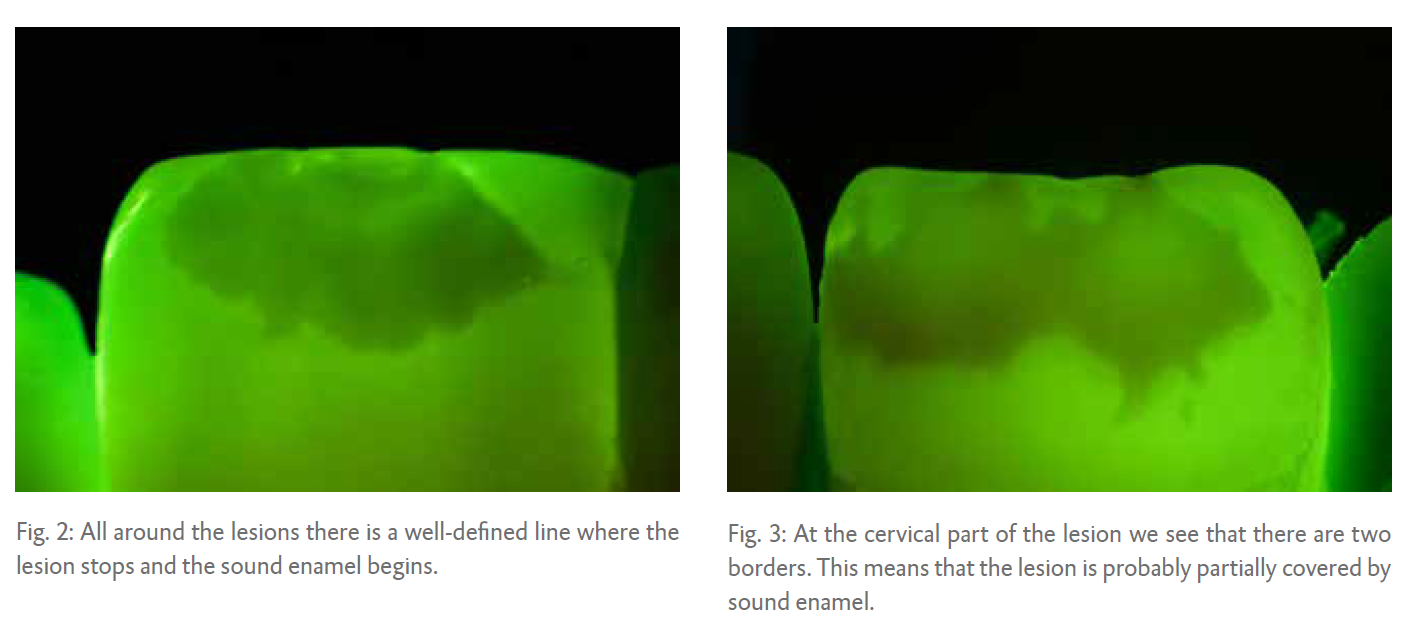
A hypomineralisation reflects more light compared to sound enamel. This phenomenon explains why we see a hypomineralisation as a white spot lesion. When we light the tooth from the back we can sometimes distinguish whether or not there is sound enamel covering the lesion.
The principle of backlighting is called transillumination. When the lesion shows a very well defined edge it is probably not covered by an enamel layer of considerable thickness (Fig. 2).
When the edges are less well defined, there is probably sound enamel partially or fully covering the lesion (Fig. 3).
Wet versus dry
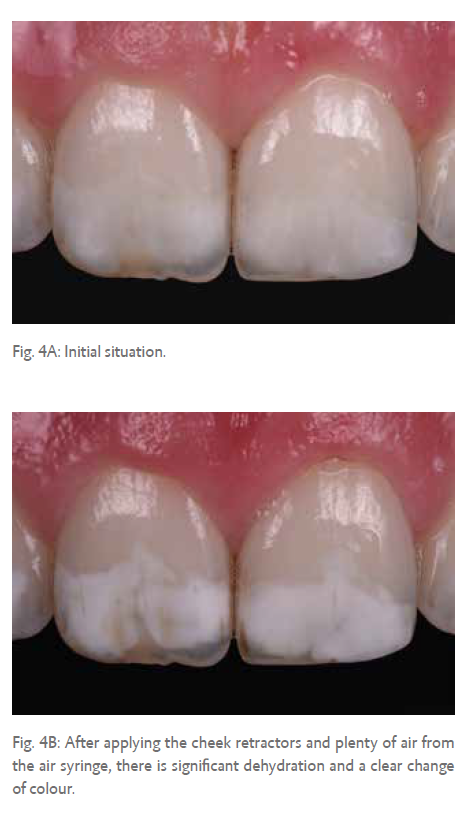
Dehydration is another technique that can be used to determine whether there is a thick or thin surface layer of sound enamel present.
Isolating the teeth from moisture with a cheek retractor and some air from the syringe can show us great differences between before and after (Fig. 4A and 4B).
When there is an obvious change it shows us there is an exchange of water, so the sound superficial layers might not be that thick. If the change in appearance is less significant, there is probably a more intact enamel surface layer. It is important to remove those sound enamel surface layers before we start with the Infiltration Concept.
This way we can save a lot of time, money and material. Below we will discuss various possibilities for removing enamel.
 Diamonds
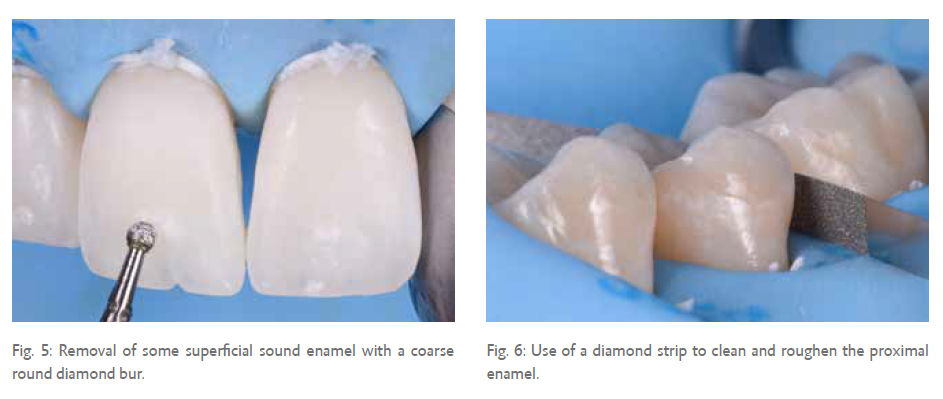
One of the easiest ways to remove a thick, sound enamel layer is with a diamond bur (Fig. 5). I prefer to use a neutral grip bur to remove the enamel. Try not to use too much water spray since this will prevent you from seeing what is happening. Visual and tactile control is of utmost importance, because we do not want to remove more enamel than necessary. Once a different in resistance is felt, there is probably a difference in the mineral content of the enamel, indicating hypomineralisation has occurred. The amount of enamel removed with a diamond bur varies a lot and depends on the grid, pressure, water-cooling and wear of the bur.
In proximal cases, I like to use diamond strips in order to clean and remove the outer surface enamel layer (Fig. 6). In carious cases, the superficial enamel layer is very thin and there is no need to remove some of the enamel beforehand in order to get good permeability. But roughening the enamel with a diamond strip does provide a better result after etching with hydrochloric acid.
Air-abrasion
Besides diamonds, powders can be used to clean or abrade the enamel too. There are many different powders for different indications.
Sodium bicarbonate (NaHCO3)
This is a very mild abrasive powder. It is mainly used for polishing and stain removal (Fig. 7). Nevertheless, it removes about 1 m of enamel in five seconds when using a particle size of 35 m.
The benefit is that etching becomes more effective afterwards. So, sodium bicarbonate powder can be useful in the proximal areas to clean the enamel prior to the etching procedure with hydrochloric acid (Fig. 8).
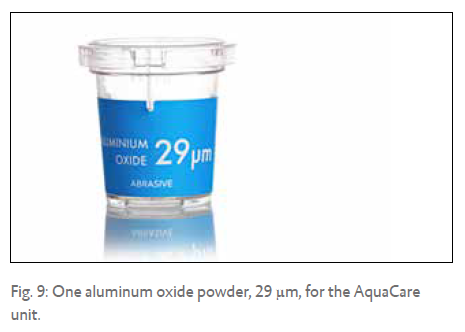
Aluminium oxide (Al2O3)
Aluminium oxide is a more aggressive abrasive powder. The larger the particles, the more aggressive it will be. Using a particle size of 29 m is recommended for minimally invasive procedures (Fig. 9). At 60 psi (4 bar) and 3 g/min it will remove about 3-4 m of sound enamel in 5 seconds. Using aluminium oxide for air abrasion will also expand the enamel surface, making enamel etching more successful.
 I like to use air abrasion for thicker lesions. With visual control you can effectively remove some of the hypomineralised enamel in order to speed up the treatment (Fig. 10A and B). Some of the hypomineralised enamel can be removed with the aid of a micro- etcher in order to achieve a thickness that can be fully penetrated by the infiltrant after etching. Note that when the abrasion is done on hypomineralised enamel the abrasion will be much higher.
Acid-abrasion
Traditionally, the Infiltration Concept uses hydrochloric acid as an abrasive acid in order to remove the superficial enamel layer. But, what happens if phosphoric acid is used?
Hydrochloric acid
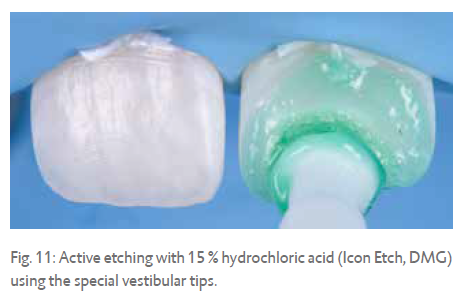
During the standard Icon etching procedure of 120 seconds, as much as 40 m of enamel is removed with 15 % hydrochloric acid. This procedure removes enough superficial enamel in cariogenic and in other superficial cases (Fig. 11).
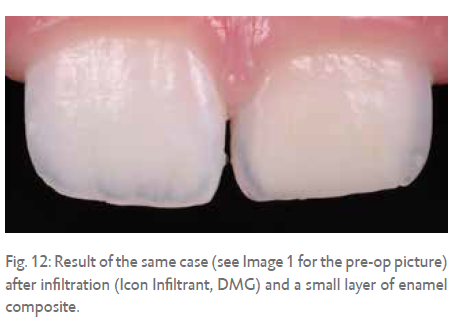
In this case, enough permeability was achieved by etching with 15 % hydrochloric acid. After infiltration a small layer of enamel composite was applied (Fig. 12).
While using hydrochloric acid it's very important to make sure that it doesn't come into contact with the soft tissue. Contact for up to 30 seconds will create ulcerations so this is definitely something that needs to be avoided. Using full rubber dam isolation is therefore recommended wherever possible. The etching effect will increase when performing active application of the hydrochloric acid. The special vestibular tips, created by DMG, are designed for active application. The hairs of a regular micro-brush will dissolve when used.
Phosphoric acid
Normally, 35 or 37 % phosphoric acid is used to etch enamel for good adhesive bonding. When applied to enamel it will remove around 4 m in 30 seconds. When activated it becomes effective for an extended period of time; it will remove about 16 m in 120 seconds. Where the area of application is not accessible, for example in the approximal zones, the application of phosphoric acid does not seem as effective.
In comparison to 15 % hydrochloric acid, phosphoric acid not only removes a lower amount of enamel, it will also dissolve the enamel prism cores to a lesser extend. Therefore the infiltration capacity is not enhanced as much as possible when using phosphoric acid.
Micro-abrasion
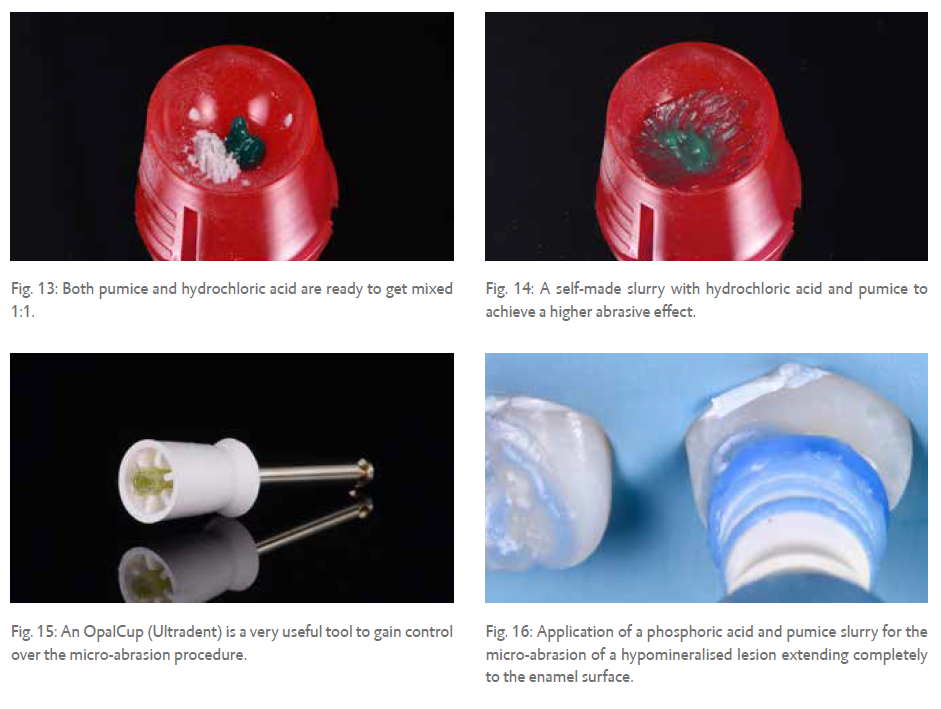
A more aggressive abrasive effect can be achieved by combining the acid with pumice. There are premixed slurries available on the market, but a self-made mixture can be just as effective. Normally, a 1:1 ratio of acid to pumice is advised (Fig. 13 and 14).
The amount of enamel removed using micro-abrasion depends on a variety of different parameters, like concentration, pH, abrasive medium, time and application mode. For the application mode a rubber cup with an internal brush can be very helpful (Fig. 15).
Some of the parameters are very difficult to quantify; for example the amount of force applied during application. Therefore all amounts mentioned are an estimation of what the micro-abrasion will do in a clinical setting.
From least to most abrasive:
Phosphoric acid with pumice
Combining 35-37 % phosphoric acid with pumice is very well suited to gentle enamel removal. It is the least abrasive slurry and it can be used for lesions that extend to the enamel surface. It will remove about 25 m of enamel in 120 seconds. It is important to note that on hypomineralised enamel this paste is likely to be more abrasive (Fig. 16).
Hydrochloric acid with silicon carbide particles
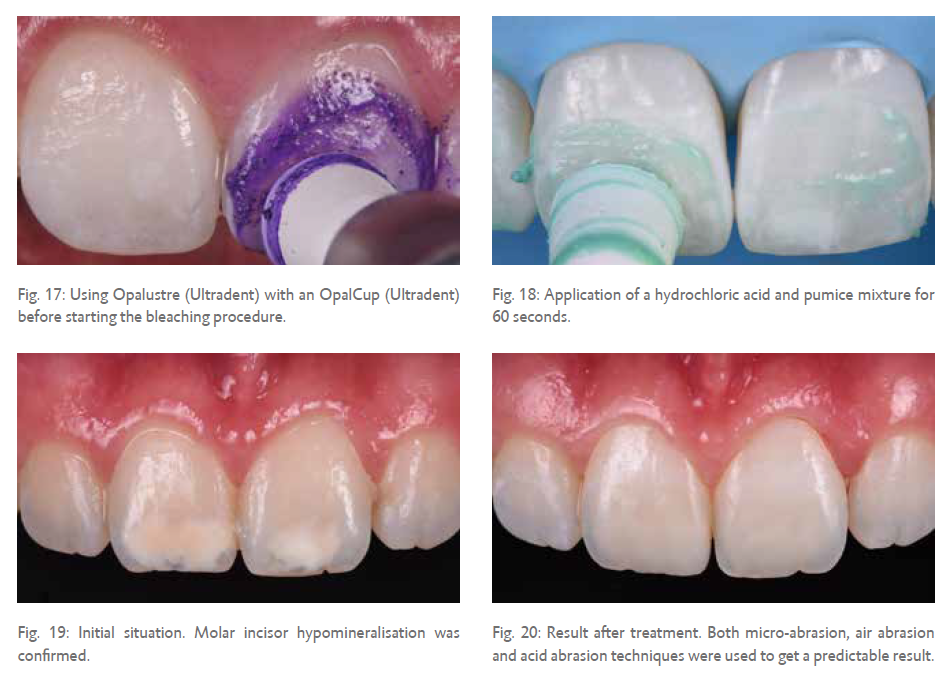
Opalustre (Ultradent) is a pre-mixed slurry with 6.6 % hydrochloric acid and silicon carbide particles. The sizes of the particles vary from 20 to 160 m. It is quite abrasive; it will remove about 40 m in 120 seconds. Since the concentration of hydrochloric acid is a lot lower, we don't need to apply full rubber dam isolation when using this paste. This slurry can be used effectively to perform some micro- abrasion before starting a bleaching procedure with carbamide peroxide (Fig. 17). It is shown that it even incorporates chloride and silica ions in the enamel. This may lead to less sensitivity compared to other micro-abrasive slurries.
Hydrochloric acid with pumice
The highest abrasive effect is achieved through the combination of 15% hydrochloric acid (Icon Etch, DMG) and pumice. It will abrade approximately 60 m in 120 seconds.
However, it is recommended to limit use to a maximum of 60 seconds at a time to keep the abrasive effect under control (Fig. 18).
Discussion
Depending on the location of the lesion in the enamel layer, different tools can be used to remove the superficial layer. When there is a thick layer of sound enamel it makes sense to use more invasive techniques, like a diamond bur, air abrasion with aluminium oxide or micro-abrasion with hydrochloric acid and pumice.
Less abrasive methods like phosphoric acid with pumice or air abrasion with sodium bicarbonate are more suited for cases where the lesion is already extending to the surface of the enamel.
The potency of the infiltration treatment is huge, especially when combined with different abrasive techniques in order to achieve a successful infiltration of the enamel (Fig. 19 and 20). In this case, MIH was confirmed and lesions extended to the dentine enamel junction (DEJ) with some superficial sound enamel on top. Micro-abrasion was carried out for 3 x 60 seconds prior to bleaching with Opalustre (Ultradent).
During the infiltration treatment a fine red diamond was used combined with some air abrasion with 29 m aluminium oxide. Next, the acid abrasion with 15 % hydrochloric acid was used as advised by DMG. After infiltration a small amount of composite bonding was performed to restore the abraded enamel.
 Dr. Erik-Jan Muts